The first day of a typical staycation for me starts with sleeping in - preferably an outrageous amount - after which I will slowly get into some of the aforementioned activities. Yesterday started in such a way, but a couple of hours after I got up, I was sitting on the couch bawling my eyes out, surrounded by my wife and dog who were trying to console me.
This is what happened.
One of the first things I used to do after waking up, is to open the Apollo app to see what’s happening on Reddit. For better of for worse, through /r/news and /r/worldnews, I tried to keep myself up-to-date on what is happening in the world. After the 2023 Reddit API I refuse to use Reddit anymore, so I looked for other outlets to consume news and being curious about local news as well, I ended up frequenting nu.nl, a Dutch news outlet.
Everybody who’s been on the modern internet for more than 2 seconds knows this: comment sections on websites are the worst. And social media are basically just giant comment sections without useful content (which is why I don’t have Facebook/Instagram/Twitter accounts anymore). For some reason, I thought it would be a good idea to create an account on nu.nl to have friendly discussions with my fellow citizens on the news of the day.
I was dumb
Each day I got confronted more and more by how excruciatingly unempathetic, selfish, unreasonable and unkind people have become. You used to be able to explain this by virtue of The Greater Internet Fuckwad Theory, which states:
Normal Person + Anonymity + Audience = Total Fuckwad
- John Gabriel (2004)
But a bunch of things have changed to make this even worse:
Yesterday, I read 2 news articles that in particular triggered emotional distress with me - and especially the comments underneath the reporting on nu.nl on those topics:
I care deeply about LGBTQI+ issues, not in the least because my father is gay, I have a transgender niece and I have many people in my social circles that identify as LGBTQI+. And what makes me so sad is that - despite years of fighting for LGBTQI+ rights - I’m noticing a clear movement backwards on these topics. People seem to have this idea that the fight for equality, equity, diversity and inclusion is over now and they’re using this to argue we should sweep any expression of "otherness" under the rug.
I’m not against gay people, but why do you have to kiss in public?
- Paraphrased from a comment under an article about the Amsterdam Pride event
If you cannot accept self-expression of other people different than you, you are effectively against those people being different
The sentiment of people towards issues I consider to be wrong in the world - and that I naively believed were generally considered to be wrong - can be summed up by me, me me. This sentiment pervades both on personal and societal level:
The first point is not only prevalent on places like Twitter, Facebook, Reddit and the comment sections of the average news outlet. Even LinkedIn - a professional networking website - is rife with people that love to "challenge" ideas to improve the global optimum just so they can optimize for their own local happiness. I lament the passing of the days when LinkedIn was about professionals discussing professional things professionally with each other.
But I’m happy to contribute to the downfall of professionalism on LinkedIn by posting this opinion piece once I’m done writing itIt’s the second point that makes my blood truly boil, especially because the acceptance of oppression is done under the guise of reasonableness. In the comment section on the article of The 1975 being banned from Malaysia, a common sentiment could be summed up as: you go to their country, you follow their laws. This completely ignores that there is such a thing as Universal Human Rights.
When you accept oppression - even under the guise of "law" - you let society slide downwards on a slippery slope and it will not end well. I truly don’t think I’m being hyperbolic when I say this kind of acceptance is pretty much exactly what happened in Europe by the end of the 1930ies.
We should always keep fighting for the rights of our fellow citizens and borders do not matter in that regard
Society turning "harder" and "colder" by the day, causes depression in me. Reading how unreasonable and intolerant my fellow citizens are, makes me immensely sad. It also makes me feel lonely, because it sometimes feels I’m the only one who still cares about their fellow citizens that are not friends or family.
To be honest, I had some pretty dark thoughts yesterday.
If only the whole of humanity would just die, it would be better for everyone, especially the rest of the species we share our planet with
- Me, after reading one inane comment too many
I feel a strong juxtaposition of the happiness induced by my wife, my pets, my friends and my job and my increasing unhappiness with the world I live in. I’m sure other people have this as well, and part of me hopes that by writing this blog post, I’ll encounter people saying "Hey, I feel this too!" which would make me feel less lonely. But it is honestly increasinly hard to deal with.
I resolve to talk more about these feelings I have with others. Maybe we can form a counter-movement. Maybe we can rebel against the tide of "not caring".
I considered not reading these comment sections anymore. I’m not sure if I should or shouldn’t, because I also think that if I can turn only one mind towards positivity and caring about others, I will have "won" a little. And not speaking up is exactly what I’m trying to rebel against here.
It is really simple. We (Society) should strive to not be a dick. You should care about your fellow citizens. We should agree to uphold Universal Human Rights.
Here is one of its most simple tennets and it is to me the core of what each person is entitled to:
Everyone is entitled to all the rights and freedoms set forth in this Declaration, without distinction of any kind, such as race, colour, sex, language, religion, political or other opinion, national or social origin, property, birth or other status. Furthermore, no distinction shall be made on the basis of the political, jurisdictional or international status of the country or territory to which a person belongs, whether it be independent, trust, non-self-governing or under any other limitation of sovereignty.
- Article 2 of the Universal Declaration of Human Rights
One important thing to note here, is that this only works if freedom of one group is not abused to limit the freedoms of another group. This means for example that you cannot limit the rights of LGBTQI+ people because you want to express your own religion.
Furthermore, I think that the time of being accepting of all opinions should come to an end. Any opinion that infringes on universal human rights, should not be tolerated. If we tolerate everything, we tolerate nothing.
It is time that news outlets and social media - such as nu.nl - take responsibility and limit the ability of people to express thoughts that lead to oppression. It is for example not ok to express your "opinion" that same-sex couples kissing is "icky" and should not be done in public. And news outlets and social media should not let you express such opinions in public.
I personally would even go so far to state that scientifically proven facts should not be allowed to be contradicted without proper evidence to the contrary. Everyone should be able to challenge the status quo, but there is the scientific method you can follow to do this in a rigorous and fair way.
When I started the new version of my blog, I promised that I would write more. That hasn’t really materialized and I don’t know if it will. I felt so strongly about the topic of this blog post, that I wanted to write down my thoughts. Let’s see if that will happen more often.
Peace!
]]>IAM is quite complex and there are several concepts you need to understand in order to know how to give people, software and machines the right access to the right resources in your AWS Accounts. This can become complicated quite fast if you’re managing multiple AWS Accounts with many different resources and services, as explained in the previous post in this series.
In this blog post I’m going to attempt to explain the terminology in a clear and concise way. Over the past months, we worked hard at Source.ag to create a good setup for our AWS-hosted infrastructure. I feel that this gave me a solid understanding of how IAM works (among other things). This blog post will help me personally as a kind of cheat sheet for later recall and hopefully be of use to others to whom these concepts are still new.
A Resource in AWS is basically any piece of infrastructure or any AWS service you can pay for and use. This also represents the things you want to control access to. Some examples of this: EC2 servers and S3 buckets.
For all these resources, you can control who or what can access them and to what extent.
An Account in AWS is a container for resources. So it’s not a representation of a human using AWS services. In that sense, it’s quite different from the typical definition of an account in online services like Twitter or Facebook, where accounts are digital extensions of human beings.
An AWS Account is used to create, manage and pay for resources. It can be similar to an environment or project, with servers, databases, S3 buckets etc.
Even though an account does not represent a user, it still has — confusingly — a unique email address attached to it and a password to log in. This login represents the AWS account root user of an AWS account.
So if Accounts in AWS do not represent human users, how is identity established so that access can be granted to resources in AWS Accounts?
This is done through Users, Roles and Groups. All three are a form of Identity in AWS. An Identity is something that can be granted access to an AWS service or resource.
An IAM User represents a human that can log into AWS and/or leverage the AWS API to use AWS services and access resources on AWS. An IAM User has 2 sets of credentials:
Two key things to understand about IAM users:
As we’ll see later, there are special kinds of users you can create that do have an email address and can access resources in multiple AWS Accounts. These are created through AWS SSO.
IAM Users can have permissions (policies, see below) that dictate what they can and cannot do on AWS. These permissions are used to allow/deny access to AWS services and resources.
Users usually represent humans but can also represent software and machines outside of AWS that you want to give programmatic access to certain AWS services and resources through the AWS API. If you want to grant software running inside AWS access to other AWS services and resources, you can use Roles.
A Role in IAM is similar to a User in that it is an Identity with permissions that determine what it can and cannot do within AWS. The difference with a User is that a Role is not tied to a specific human or machine. Instead, a role can be assumed by users or AWS services to temporarily gain access to certain AWS services and/or resources.
Roles do not have permanent login/API credentials. Instead, a role provides temporary credentials when the role is assumed.
In IAM, Groups are used to group Users together so the same permissions (policies, see below) can be applied to multiple Users at once.
Now that we have established that we have Resources * and Identities* that can potentially access those Resources, how exactly do we determine who can access what?
This is done through Policies. In IAM, Policies are basically permissions on resources
A policy defines access (or denial) to an AWS service and/or resource. There are 2 types of policies:
A policy contains the following elements:
The Principal is only specified in the case of Resource-based policies. That makes sense if you think about it, because in the case of Identity-based policies, the Principal is the Identity itself the policy is attached to!
Let’s say that we want to give IAM User kiara access to read all files in the confidential-data
S3 bucket. What would the Effect, Resource and Action look like for our policy? The policy would
look something like this:
{
"Effect": "Allow",
"Action": [
"s3:List*",
"s3:Get*"
],
"Resource": [
"arn:aws:s3:::confidential-data",
"arn:aws:s3:::confidential-data/*"
]
}
This policy would then be attached to the IAM User kiara to grant her access.
As mentioned before, for Identity-based policies, you don’t need to specify a Principal. But what exactly is a Principal? Is it the same as an Identity? It turns out it’s more than that:
A Principal is an AWS identity or Service. To understand why services can be used as Principal, we have to understand where Principals are specified, which is in 2 places:
When specifying a Principal in a Role, we can say that instead of allowing a regular (human) User to assume the Role, we can allow an AWS Service (e.g. AWS Lambda) to assume the role for us. An example of how this can be useful: we could allow a function run on AWS Lambda to send a message on an SNS topic for us whenever something important happens during its execution. To do this, we would create a special Role for this Lambda function with a Policy attached that would allow this Role to publish messages on an SNS topic. Then we would allow AWS Lambda to assume this Role.
What is perhaps counter-intuitive, is that Identity-based policies are more common than Resource-based policies for defining access to resources. The common way of doing things, is to attach policies to Identities to specify what Resources they have access to and in what ways.
Part of the reason is that Resource-based policies are not supported by all services and resource-types in AWS, whereas you can use any Resource identifier in an Identity-based polity.
So in what situations are Resource-based policies being used?
Resource-based policies are often used when you want to grant an Identity outside your AWS account access to a Resource in your AWS account. To understand how this works, let’s assume the following scenario:
secret-stuff
secret-stuff
bucketsecret-stuff
bucket that Company A
as granted them access toTo make this happen you have to do 2 things:
secret-stuff
bucket): on the
aforementioned S3 bucket, we would create a Resource-based policy that has AWS Account B as
principalsecret-stuff
bucket, which happens to live in AWS Account A.What is interesting here, is that Company A would have no say in exactly what Identity is used
by Company B — in AWS Account B — to access their resource. The only thing they would control, is
the fact that AWS Account B can access their resource in AWS Account A. It is Account B where it is
determined exactly what Identity gets to access the secret-stuff
bucket.
As explained in the previous blog post, you can leverage AWS Organizations to group multiple AWS Accounts together to consolidate billing but also access control.
How does IAM work in the context of AWS Organizations? This happens through 2 additional concepts:
AWS Single Sign-on lets you define Users and Groups in a central place — usually in the management account of your AWS Organization — and control access to resources in all AWS Accounts in an Organization for those Users and Groups.
SSO Users have a few fundamental differences compared to regular IAM users:
SSO Groups are similar to IAM Groups in that they’re used to group together Users so that the same policies can be applied to all users within a group. A key difference here is that — just like with SSO Users — policies are not attached to SSO Groups directly.
If you cannot attach policies to SSO Users & Groups directly, how can you allow those Users & Groups access to resources in the AWS Accounts in your Organization? This is done through Permission Sets.
Permission Sets are basically the AWS SSO alternative to regular IAM Policies. They are set up in a very similar way — with Effects, Actions and Resources. The big difference is that Permission Sets are not applied to an SSO User/Group alone, but they are applied in combination with an AWS Account.
A Permission Set is applied to an SSO User/Group for a specific AWS Account
This means that when you apply a Permission Set to an SSO User/Group, you choose an AWS Account so that the policies defined in the Permission Set are applied to the SSO User/Group for the selected AWS Account.
Example: let’s say you have created a Permission Set that allows read-only access to all resources.
Now you can grant kiara@examplecorp.com
read access to all resources in Account A in your
Organization by applying the aforementioned Permission Set to kiara@examplecorp.com
specifically
for Account A.
Permission Sets encourage reuse of similar policies across AWS Accounts and SSO Users.
If you apply a Permission Set to an SSO User for a specific AWS Account, how does that work
internally? In the end, AWS will still use IAM to do the actual access management. For each
Permission Set you apply to a certain AWS Account — for 1 or more SSO Users/Groups — AWS will
create a dedicated Role in that AWS Account. Let’s say that in the example above where we want to
grant read-only access, we called the Permission Set ReadOnlyPermissions
. When we apply this
Permission Set to Account A for kiara@examplecorp.com
, AWS will do 3 things:
ReadOnlyPermissions
Permission SetReadOnlyPermissions
Permission Setkiara@examplecorp.com
as Principal to the created Role so she can assume that Role
in Account ANow when kiara@examplecorp.com
logs into AWS using SSO, she will be presented with a choice to
assume the ReadOnlyPermissions
Role in Account A — next to all the other Roles she can assume
in the same or other AWS Accounts in the Organization, all based on the Permission Sets applied
to her for specific Accounts.
When I started writing this post, I hoped it would be concise. I guess I failed a bit on that account, which just goes to show how complex AWS IAM really is. I still hope that this gives you an overview that is easier to digest than reading through pages of AWS documentation.
Thanks to Dan for proofreading this yet again! ❤️
]]>When I started working at Source about 9 months ago, it was just me — the first employee — and the 2 founders. The only code written, were a couple of demos for investor pitches which we threw away quickly. I was in the luxurious position to be able to start building our product from scratch. I deployed everything I built into a single AWS root account.
Fast-forward to today, and we’re with more than 30 people — most of whom are software engineers and data scientists writing and deploying code. In December, we finished migrating all of our infrastructure to a multi-account setup in AWS. In this blog post I want to explain why we did this and what our multi-account setup looks like.
As mentioned, when we started everything was deployed into a single AWS account. When the moment came that we wanted to have separate development and production environments, I created 2 VPCs in the same account and deployed an identical setup in both, each consisting of:
It looked something like this:
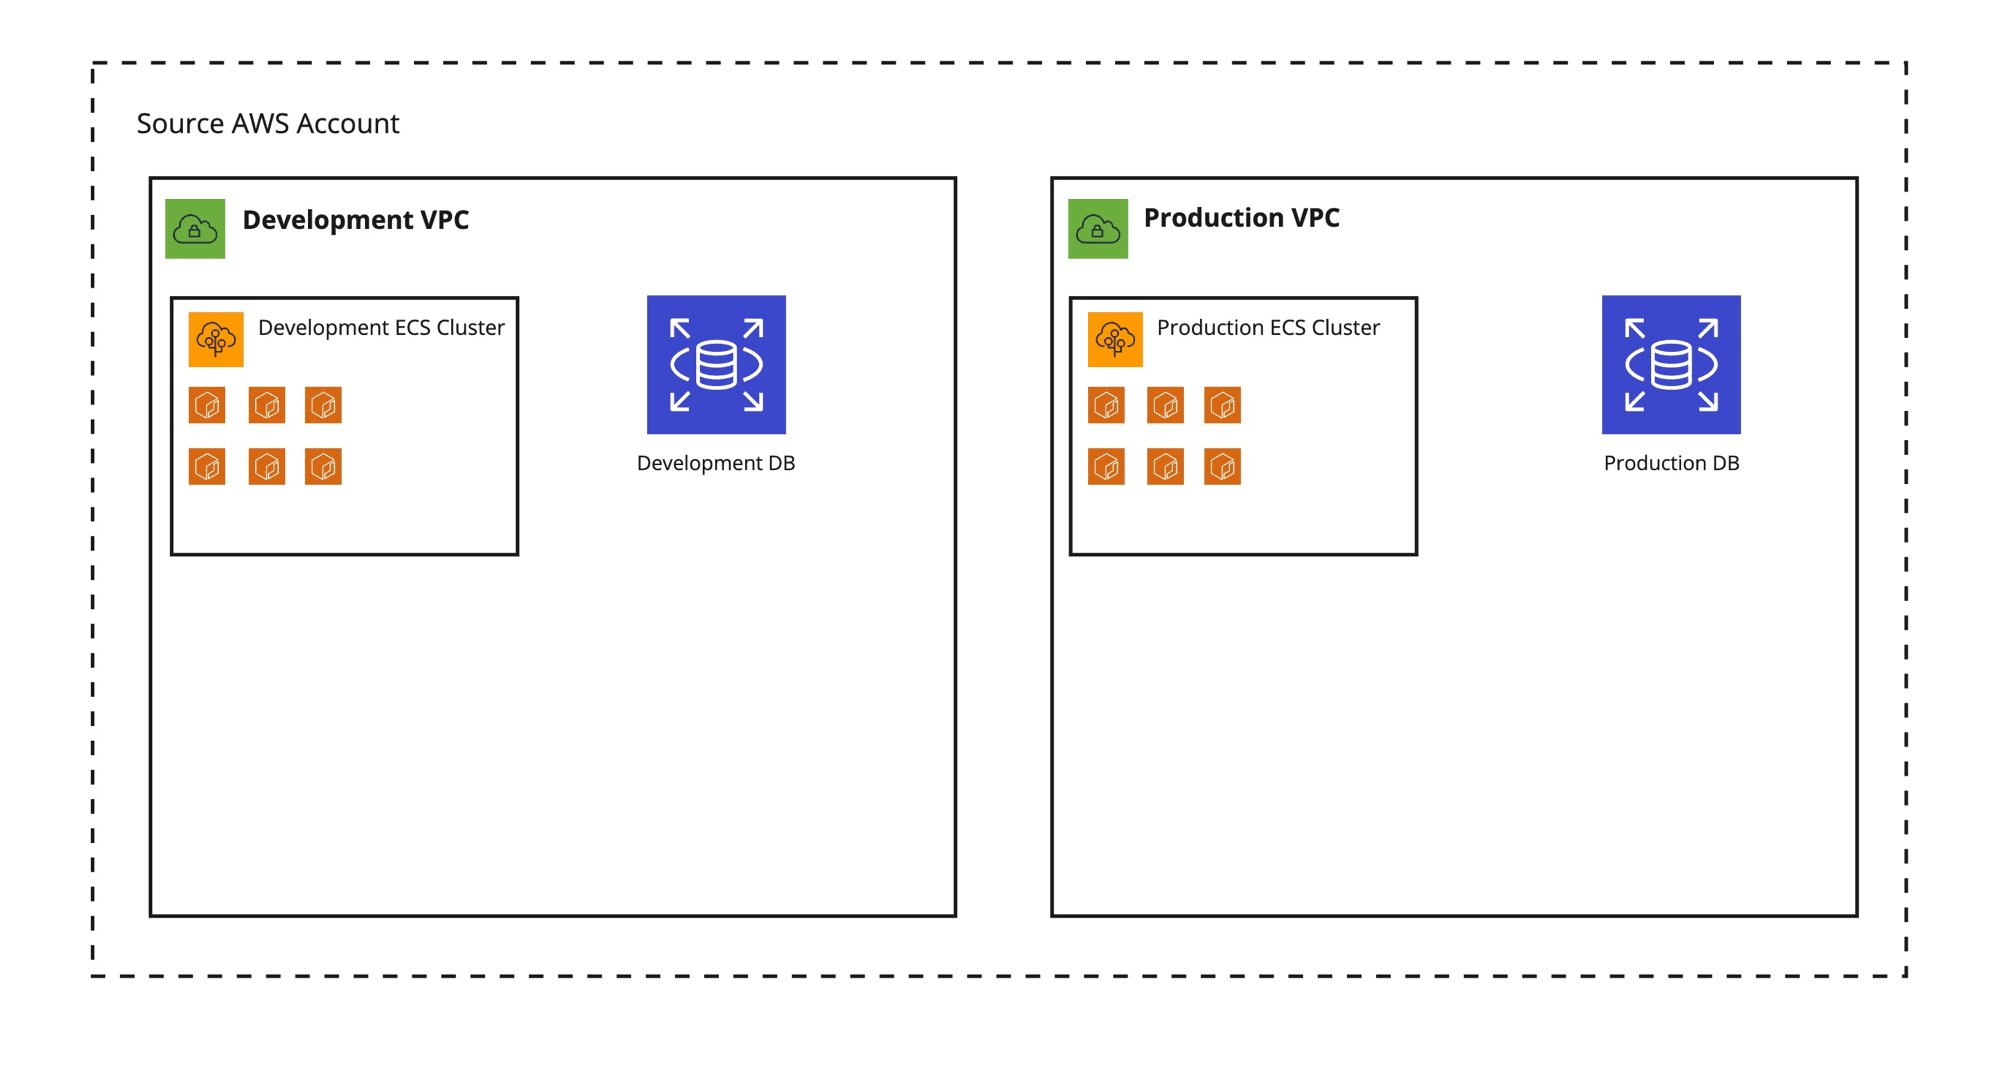
I deployed our applications and services (except for our frontend, which is deployed on Vercel) in two identical VPCs — still living in the same AWS account — and called it a day.
When we started building our team and the first software engineers and data scientists joined, I created IAM users for everyone and solved access control by defining groups with specific IAM policies (permissions) attached to them and adding the IAM users to those groups. The more people joined the team, the more diverse the access requirements became, for example:
And there are many more subtle differences in the kind of access to infrastructure people need and should have.
In the end, our single-account setup made it difficult to build a secure and resilient infrastructure:
Many of these problems can actually be solved — even in a single-account setup — by "properly" tagging all your AWS resources and creating elaborate IAM policies for users and resources based on those tags. But such a tagging strategy will quickly become really complex and will cost a lot of time to maintain. Needless to say that it’s quite error-prone as well.
Aside from the security and safety implications, our setup had some other problems:
When I was researching a way forward, I found many blog posts extolling the virtues of putting your infrastructure into multiple AWS accounts. But before getting a better understanding of how this would work, I had some reservations about using multiple AWS accounts:
AWS offers a nice solution to these problems (and others) in the form of AWS Organizations
According to AWS:
An organization is an entity that you create to consolidate a collection of accounts so that you can administer them as a single unit.
AWS Organizations lets you organize a bunch of related AWS accounts in a hierarchical, tree-like structure. It will let you manage all those accounts from one central management account. With Consolidated Billing, all bills from all member accounts will be aggregated to the management account where you can pay them as one.
Arguably the most powerful feature of AWS Organizations is that you can group the member accounts together in Organizational Units (OUs) and apply common security policies to those. This lets you define permissions and control access in broad strokes — and from a central place — while keeping the natural separation of concerns that comes from using separate AWS accounts to organize your infrastructure.
When it comes to user management, AWS Organizations offers the convenience of letting users log in with one user account (not to be confused with AWS account), using AWS Single Sign-on. AWS SSO lets you create users in the root account (also known as management account) of your organization and give them login credentials within AWS itself or link them to an external identity provider like Google or Active Directory. You can then give these users access to specific AWS accounts within your AWS Organization. Users can be assigned specific permissions within these accounts. (I will explain more on how this works in a later blog post)
This has several advantages compared to using regular IAM users:
Well, I don’t know. But I do know what works for us so far
When deciding what AWS accounts to create and how to group them, I had the following requirements:
This was aside from solving the aforementioned problems we had with our single-account setup.
This led me to create the following accounts, organized by Organizational Unit:
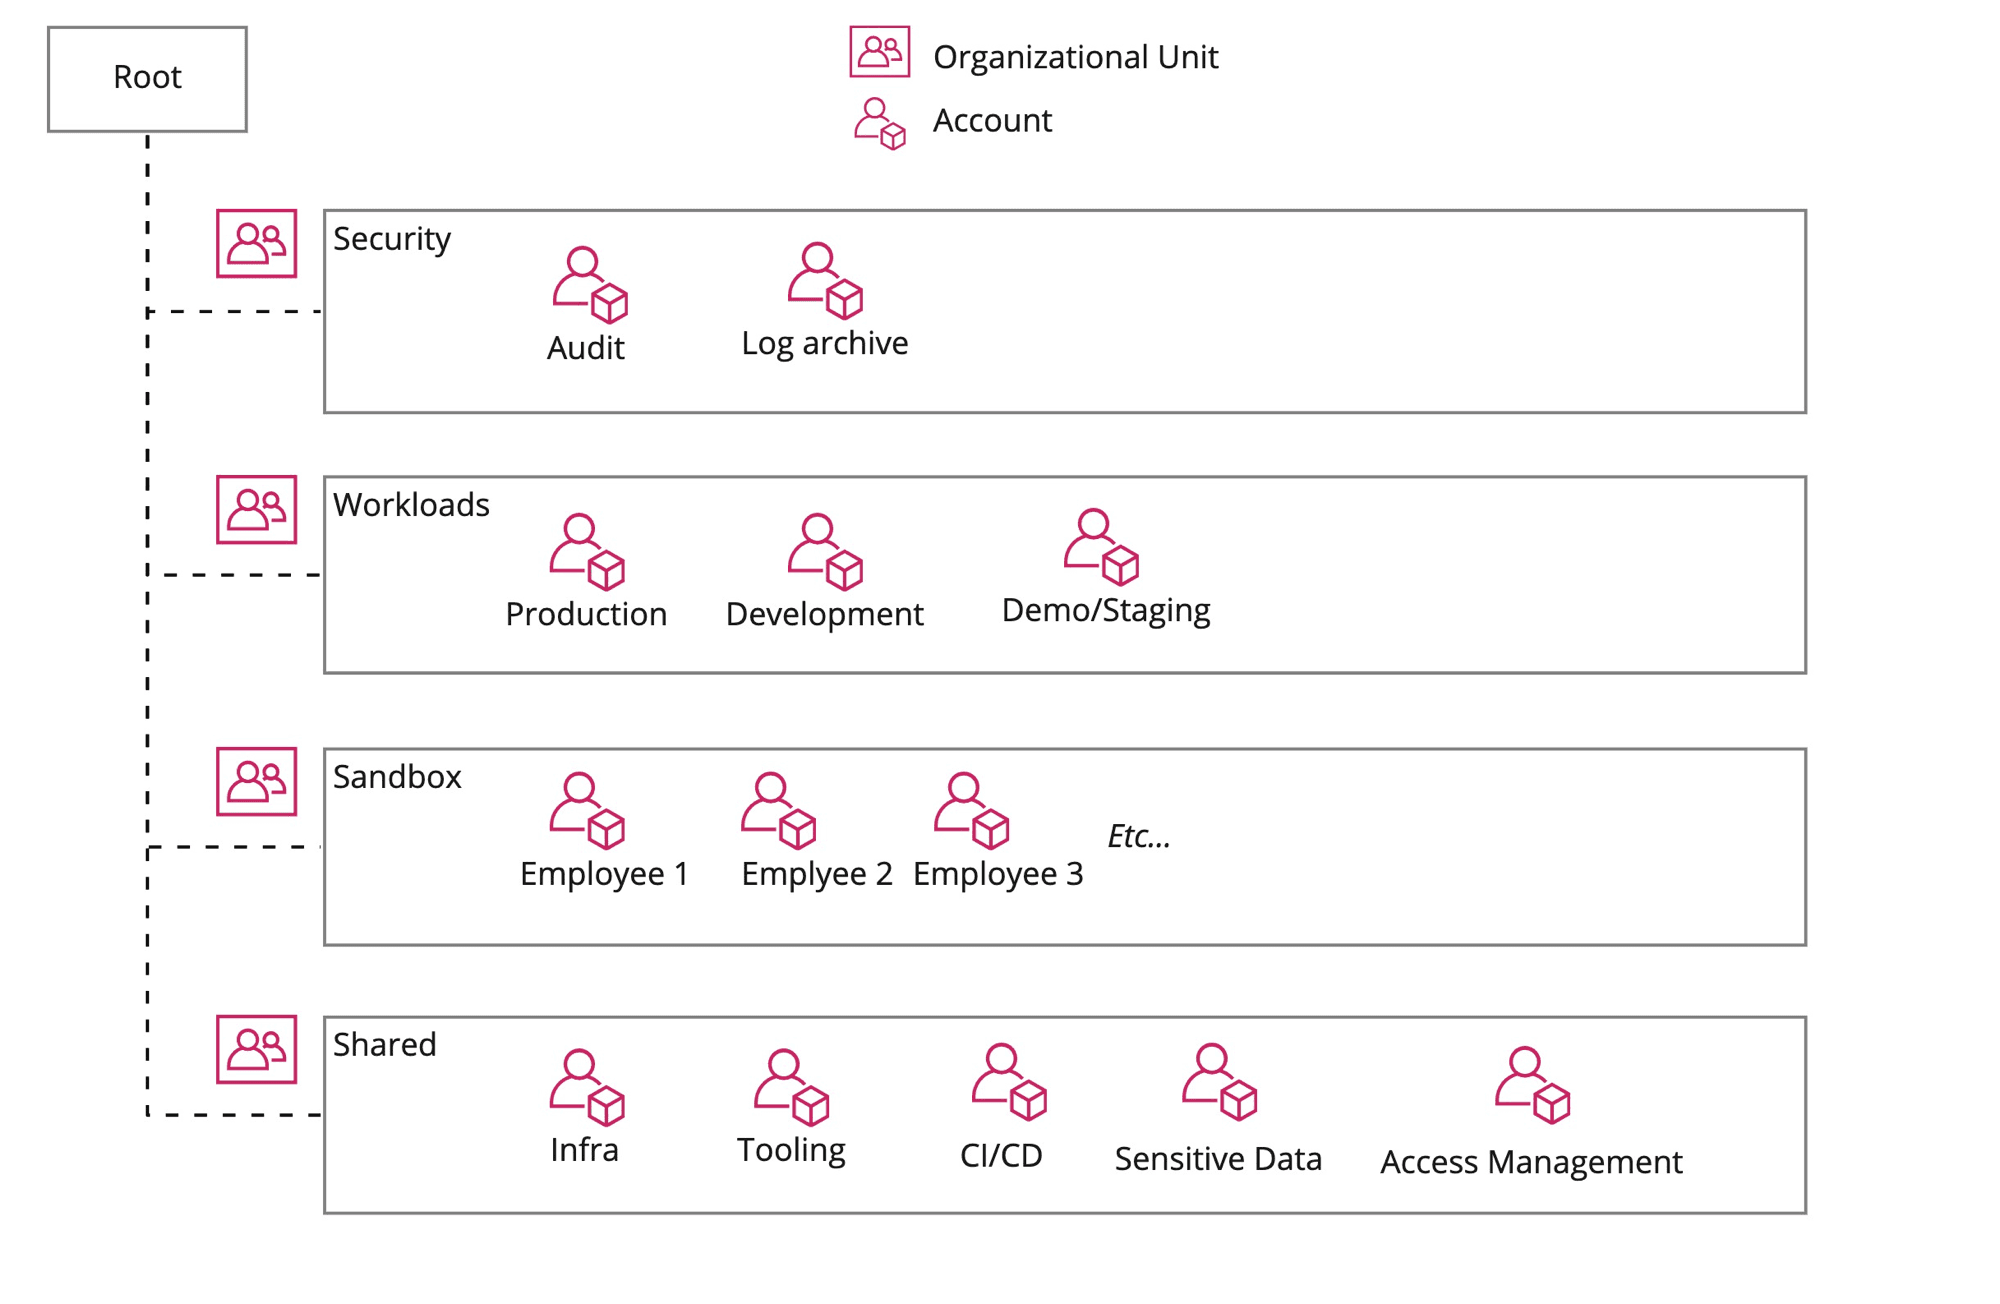
Some notes and highlights:
Using AWS Organizations we have now set up our infrastructure at Source in such a way that it is more secure and also more scalable and easier to maintain from a security perspective. Our Software Engineers and Data Scientists have easier access to the infrastructure, services and resources they need — using only one set of credentials — without exposing them to sensitive data and/or critical infrastructure.
In future blog posts I will elaborate on the steps taken to set all of this up and share some practical guides on how to use a multi-account setup on a day-to-day basis.
Thanks to Dan for proofreading this ❤️
]]>One thing that bothered me is that, whenever I create a new virtualenv and use pip
in it, I am
inevitably greeted by a message telling me pip
is out-of-date:
WARNING: You are using pip version 21.2.3; however, version 21.3.1 is available.
You should consider upgrading via the '~/.pyenv/versions/3.10.0/envs/test/bin/python3.10 -m pip install --upgrade pip' command.
So I end up always having to upgrade pip after creating a new virtualenv. Wouldn’t it be nice if this could be automated?
Turns out, we actually can by leveraging pyenv hooks.
pyenv hooks are scripts that are executed by pyenv whenever certain commands are run. These can be
regular pyenv commands like pyenv install
or pyenv rehash
for example. But what is not
apparent from the pyenv documentation, is that you can also create hooks for plugins, like
pyenv virtualenv
.
You can create a hook by creating a script at the following location:
$PYENV_ROOT/pyenv.d/<hook-name>/<whatever>.bash
hook-name
here can be any of: exec
, rehash
, which
, install
— which are all regular pyenv
commands — but it can also be a plugin command, like virtualenv
. The filename of the script doesn’t
matter, and neither does the extension. I use .bash
here to make it explicit that this is a bash
script, but pyenv hooks can be written in any language.
To create a hook that upgrades pip
and some other default packages, you can create a new script
as follows:
mkdir -p $PYENV_ROOT/pyenv.d/virtualenv/
$EDITOR $PYENV_ROOT/pyenv.d/virtualenv/after.bash
Where $EDITOR
is your favorite editor (like vim
, RIGHT?!)
Then add the following contents:
after_virtualenv 'PYENV_VERSION="$VIRTUALENV_NAME" pyenv-exec pip install --upgrade pip setuptools wheel'
after_virtualenv
is the command that tells pyenv when to execute the following command. In this
case its defined by the pyenv virtualenv
plugin. First we set the pyenv version to the name
of the virtualenv we just created. This is set by pyenv virtualenv as $VIRTUALENV_NAME
. Then we
install/upgrade pip
itself and setuptools
and wheel
.
That is all there is to it! Now any time you create a new virtualenv using pyenv virtualenv
, the
aforementioned packages will be automatically upgraded after the virtualenv was created.
When moving our code to production however, we want to have more guarantees about the behaviour of our code. Writing (unit) tests is one way to get those guarantees, but we also make heavy use of type hints to give us more confidence in our code. Type hints can also provide a productivity boost, because not only humans can reason better about type hinted code, your editor can as well!
Sometimes though, using type hints everywhere can feel like you’re losing out on a lot of the magic and speed that a dynamic type system brings you. One particular trait of dynamic typing that is pretty idiomatic in Python, is duck typing.
Duck typing is a philosophy in programming where you care more about the behaviour and properties of an object than its stated type to determine if that object is useful in a certain situation. Duck typing is inspired by the duck test:
If it walks like a duck and it quacks like a duck, then it must be a duck
In practice this means that when you write a function that receives a certain input, you care only about the behaviour and/or attributes of that input, not the explicit type of that input.
One interesting question that arises is: if you don’t want to be strict about the type of the parameters a function receives, are there still any static type guarantees to be had?
And the other way around is interesting as well: if you have a function with statically typed inputs, can you loosen up those parameters to make the function more universally useful, the way duck typing does?
As it turns out, Python provides a neat way to have our cake and eat it too!
When reviewing some code recently, I came across a function that looked roughly like this:
def calculate_windowed_avg(
measurements: Union[List[TemperatureMeasurement], List[HumidityMeasurement]],
window_size: timedelta,
field_name: str
) -> Dict[datetime, float]:
window_upper_bound = measurements[0].timestamp + window_size
current_window = []
window_averages = OrderedDict()
for m in measurements:
# various calculations happen here
# based on the timestamp of each measurement
...
return window_averages
The goal of this function is to calculate the average of a certain field (identified by field_name
) in a rolling window. At the time of writing this function, we were using it for
TemperatureMeasurement
and HumidityMeasurement
, but it is very likely we’ll want to use it for
different types of measurements in the future.
If we look closely at how the function uses the input, it turns out that the only thing we want to
be guaranteed of, is that the items we pass into the function have a timestamp
field. So instead
of specifying each different type that has adheres to this contract, we’d like to tell the type
checker that we only care about having a timestamp
field to work with.
Protocol
from the typing
module lets us do that. Just like with duck typing, Protocols let
you specify the behaviour or attributes you expect, without caring about the type. Here is what
that looks like:
from typing import Protocol, List, Dict
from datetime import datetime
class MeasurementLike(Protocol):
timestamp: datetime
def calculate_windowed_avg(
measurements: List[MeasurementLike],
window_size: timedelta,
field_name: str
) -> Dict[datetime, float]:
window_upper_bound = measurements[0].timestamp + window_size
...
Now the type checker doesn’t know exactly what the type is of whatever is provided as measurements
but it does know what those items have a timestamp
field because they adhere to
the MeasurementLike
Protocol.
In a sense, a Protocol acts like one side of an Interface as we know it from Java or Typescript. Instead of having to specify the behaviour and properties both on a type and on the functions that use it, we only have to specify it on a function, without caring about the types of the objects that are provided to the function.
You can also use Protocols together with TypeVar
for even more generic functions that are still
type checked to some extend. One use-case that comes to mind, is when you don’t care about the
input type to a function, as long as it follows a protocol, but you also want to guarantee that
the output of the function is of the same type as the input, no matter what the exact type is.
This works as follows:
from typing import Protocol, TypeVar
from datetime import datetime
class MeasurementLike(Protocol):
timestamp: datetime
M = TypeVar('M', bound=MeasurementLike)
def measurement_as_timezone(measurement: M, tz: tzinfo) -> M:
measurement.timestamp = measurement.timestamp.astimezone(tz)
return measurement
Here we create a function that takes any object that has a timestamp
field and guarantees that
the output will be of the same type as the input.
Protocols in Python provide a nice way to use duck typing while still having some static type guarantees. You can define contracts for your functions without caring too much about the actual types of your inputs.
Update on 2021–11–23: There was a wrong type annotation in this article, as pointed out by ragebol on Hacker News, which is now fixed
]]>Publish (on your) Own Site, Syndicate Elsewhere.
RSS is an important part of that strategy.
Luckily, I’m not the only one who values RSS. There are others
In this article I want to share how I implemented syndication feeds in my NextJS-powered website.
I did some Googling to see how other NextJS users were generating RSS feeds, and there turned out to be many people that had solved this particular problem and wrote about it I found a couple of different approaches to generating and rendering RSS feeds in NextJS:
Generating feeds:
Rendering feeds:
Content-Type
header for statically generated pages, so you can’t serve
those pages as application/rss+xml
. I’m not how big of a problem this is and what black
magic Vercel applies when serving my NextJS siteAfter looking at the options, I decided on the following requirements for my feeds:
As per my requirements, I wanted to generate the feeds at build time. But as mentioned before,
NextJS doesn’t support setting the Content-Type
header for statically generated pages.
The alternative that many people use, is to have a separate script generate your feeds and
writing them to the public folder where all other static assets such as images are stored as well.
That way, the feeds would be served as static assets instead of statically generated pages — which,
from the browsers perspective doesn’t make a difference!
I found a good explanation by Ashlee Boyer of this technique.
My plan:
postbuild
step so it would always be invoked after building the site
using npm run build
(this happens not only locally, but also when Vercel deploys my site)I immediately hit a snag with (1), because I couldn’t manage to use ES6/Typescript modules in a script run outside of my normal website code.
I’m using Typescript, and apparently ts-node
, the tool to run Typescript files, doesn’t support
modules. Writing the script in Javascript wasn’t really an option for me because I wanted to reuse
a lot of logic that I already wrote for reading and parsing MDX files in the website itself.
I decided to follow the route that Ashlee Boyer suggests in her blog post and sneak in the
function to generate my feeds as a "stowaway" in the getStaticProps
function of my index
page. This works beautifully!
export const getStaticProps: GetStaticProps = () => {
generateMainFeeds();
const lastPosts = getAllPostsFrontMatter('blog', 3);
return {
props: {
lastPosts,
},
};
};
The code of my website already supported translating MDX files into valid JSX to be rendered by React. But how to generate valid HTML from that content and include it in the feeds?
I couldn’t find many examples of this, but did find out about ReactDOMServer.renderToStaticMarkup
.
This function will take a bunch of React components and render them into HTML. This is what is
used by many React server-side rendering solutions (maybe also by NextJS?) and works perfectly
here as well.
One caveat: if your content contains internal links — which are often relative links — then you have to be mindful that those relative links are meaningless in the context of an RSS feed. The way I solved this is by doing some regex-based replacements on the generated HTML.
The complete content generation part looks like this:
const url = `${baseUrl}/blog/${post.frontMatter.slug}`;
const htmlContent = ReactDOMServer.renderToStaticMarkup(
<ChakraProvider resetCSS theme={theme}>
<MDXRemote {...post.mdxSource} components={MDXComponents} />
</ChakraProvider>
.replace(/href="\/#/g, `href="${url}#`)
.replace(/href="\//g, `href="${baseUrl}/`)
.replace(/src="\//g, `src="${baseUrl}/`);
)
My site uses Chakra UI for theming, which uses
Emotion — a CSS-in-JS library — under the hood. Emotion will happily
render tons of
tags when statically generating HTML from your React components. For most
use cases where you render React on the server (statically or not), this is desirable. In the case
of RSS/Atom feeds, this is pretty useless.
The solution here is to strip all the
and tags from the generated HTML.
Rather than summoning
The One whose Name cannot be expressed in the Basic Multilingual Plane
by trying to use regex here, I found this library
to help me with this task:
const cleanHtmlContent = stripHtml(htmlContent, {
onlyStripTags: ['script', 'style'],
stripTogetherWithTheirContents: ['script', 'style'],
}).result;
I now have serve RSS, Atom and a JSON Feed for your reading pleasure. Most of the relevant code can be found here
At some point I want to diversify my writing output by not only writing about tech. And even within the topic of tech there are many sub-topics I could write about, not all of which are equally interesting to every reader (all 5 of them, including my mom 👩👦). I’m planning to introduce tags to allow filtering content once I have enough of it.
Once I have tags, I would like to start supporting dynamic feeds so readers can subscribe only to the stuff they actually want to read. I imagine building an endpoint like this:
/feeds/by-tags.xml?tags=tag1,tag2
I’m curious if others are doing this!
]]>To be fair, the author did clarify that they’re not against IDE’s in general and they actually use one on a daily basis.
When reading the discussion, one of the first things I wondered is if there are places on the internet where carpenters or plumbers furiously criticize each other’s choice of tools. But even that has a place on Hacker News
In this post I want to explore the fundamental problems with this type of discussion and how you can embrace freedom of choice.
When discussing someone else’s choice of tools — in this case the choice of editor or IDE — it’s good to be mindful of what we don’t know about this person and their reasons for choosing certain tools. Aside from personal preference and/or familiarity, there can be lots of extra factors to consider:
I think it’s good form to voice an opinion only when we can see the whole picture. I also think that people should be encouraged to choose the right tool for the job. And to put it simply: the right tool for the job is the one that fits the problem and makes you the most productive.
Another issue with this kind of discussion is that everyone has a different idea of what really constitutes an "IDE". We’re inclined to frame the choice of editor as a binary choice — "pure text editor" vs "IDE", almost like a false dichotomy — while it really is a spectrum. On this spectrum you’ll not only find different editors, but even different configurations of the same editor with varying degrees of "smartness" applied through plugins.
So when someone says "why use an IDE when you can do everything an IDE does in VIM if you install the following 20 plugins", is this really so different from an actual IDE (that was branded as such)?
When looking at how people setup their development environments, I basically see 2 different approaches:
To me, both approaches have their merits and uses!
I think the most important question around editors is not
How to choose the right editor?
but rather
How to enable each member of my team to choose the editor that makes them most productive, while enabling effective collaboration?
Here’s my recipe to do that:
My basic starting point in teams: everyone can use the editor/IDE of their choice. To enable effective collaboration, the following rules must be followed:
I have to admit that in some ways I also limit choice within my teams: building and running projects often involves shell scripts which are portable between Linux and MacOS, but not to Windows. This can be solved by using WSL on Windows.
My personal setup involves quite a lot of tools.
For any "serious" development work (i.e. long stretches of coding and big projects) I take the aforementioned "subtractive" approach. My basis is one of the Jetbrains tools, depending on the language(s) I’m working with. I find the Jetbrains tools make me really productive and their All products pack offers great value for money, especially with their huge loyalty discounts after 1 or more years.
I still use the terminal and external tools for many things in this case. I put quite some time in improving and maintaining my dotfiles as well.
For quick and short edits and viewing files where speed is preferred and conveniences like syntax highlighting and intellisense are not important, I use Sublime Text or VIM. Example of this: editing my dotfiles.
Sometimes, but rarely, I use VSCodium for editing or viewing files which are not part of a project and which I want to reformat/reindent. This doesn’t work well for me in Sublime Text. For example: viewing/editing minified JSON files.
To wrap this post up, I just want to reiterate: use whatever tools make you productive and help you solve the problems you’re trying to solve and please let others do the same.
And here’s some additional closing advice: should you ever grow unhappy with the tools you’re using, just write a blog post extolling the virtues of your current tools. You can be sure people on the internet will tell you how much better their tools are, thereby providing you with potential alternatives to your current setup 😇
Thanks to Dan for proofreading this
]]>When I started developing the primary (web) UI for the product we’re building at Source, I quickly decided to use the NextJS framework as the basis for the frontend. One thing I really like about NextJS is that it does filesystem-based routing. Even though I like to diss on PHP as much as the next person, this particular feature of NextJS reminds me a bit of PHP in a good way.
Another very compelling feature of NextJS, is the ability to have different rendering strategies for each different page. You can decide to use:
This particular feature requires a specific hosting setup that supports the different flavours of rendering. You basically want:
The NextJS documentation mentions a couple of options for deployment:
At Source however, we’ve made a conscious decision to use AWS for all of our infrastructure needs. We’re too early in the lifecycle of both our product and company to consider a hybrid cloud setup and AWS offers all the features that we need for prices that are reasonable for now. Through one of our investors we also got a boat-load of AWS credits to get started, which helps.
I didn’t want to manually set up a hybrid deployment with NodeJS and CDN - which I could probably do using Cloudfront and ECS - so I looked for alternatives. AWS Amplify claims to be the
Fastest, easiest way to build mobile and web apps that scale
And they claim to support NextJS as well as server-side rendering by virtue of Lambda@Edge
Sounds great! So how does that all work?
The idea behind Amplify is that it lets you focus on building your app without having to worry about the infrastructure. This means that it will not only let you build and deploy your frontend easily, it will also let you hook-up backend components like authentication through Cognito, a GraphQL API using AppSync and a DataStore.
The way Amplify manages all of this, is through the idea of "backends". A backend contains one or more of the aforementioned components. You can setup different backend environments in Amplify and couple these to different (git) branches of your frontend.
We are bringing our own database and API and wanted to use a pre-existing Cognito user pool. Amplify lets you import an existing Cognito user pool instead of creating one for you, and this worked fine… until I tried to create a second "backend environment" with a different Cognito user pool.
I want to allow different users on our development environment than our production
environment. These environments correspond to the main
branch in Git (production) and any other
branches in Git (development).
Interaction with Amplify is done through the web console or the Amplify CLI. According to the documentation, we can create a new Amplify backend environment like this:
amplify env add
But nowhere is it made clear how this is linked to our frontend branch. The Amplify CLI tries to
mimic the git
CLI by having amplify push
and amplify pull
. So I assume we need to push
our
new environment to the cloud. Does this command depend on the git branch I’m on? I don’t know.
I could just as easily overwrite my existing backend environment when using this command.
Eventually I was able to create a main
environment and a dev
environment, but no matter how hard
I tried, I could not get those environments to use different Cognito user pools.
The Amplify CLI will create some configuration files, some of which you need to commit to git, and some of them you need to ignore. These files should make the build reproducible. It is unclear however, what a new developer needs to do to be able to run an existing Amplify project. The documentation mentions multiple Amplify CLI commands to setup a project:
amplify pull
amplify init
amplify configure project
amplify env checkout
To be run in arbitrary order?
Three similar questions on StackOverflow give 3 different answers on this topic.
When I was on-boarding new team-members, we basically tried some commands in different order until we were able to run the project locally for that engineer.
In short: you don’t. Or you enlist the help of AWS Support (which you will have to pay for). The Amplify web console doesn’t share detailed build logs, so you’ll have to fix your problems by trial and error.
AWS Amplify seems to have quite some bugs. For example: when you use Gitlab, you cannot put the source code of your project in a sub-group. This will silently fail your build, with no clear error message in sight.
The aforementioned problem of using multiple Cognito user pools for different environments of one Amplify frontend, I also consider a bug.
Not having access to the actual build logs, I also consider a bug.
The most painful issue I have with AWS Amplify - and AWS in general - is the complete lack of support. You are paying a lot of money for their services, but that does not come with any form of support, unless you pay extra. And when you make use of that paid support, it goes something like this:
This means that in practice, AWS Amplify is not usable unless you are willing to pay extra for support and have a lot of patience.
As a side note, I find it really frustrating that with big corporations like Amazon in general, you quickly feel helpless and ignored when you have problems. Stories about Google customer support (or lack thereof) are rampant on Hacker News, and I think Amazon is no different. You’d think that with so much revenue they should be able to set up actual proper customer support 🙄
I think that these problems with Amplify are endemic of a larger problem with AWS: their PaaS and SaaS solutions suck. Aside from pricing (which is quite high compared to competitors like Digital Ocean), I think AWs’ infrastructure-as-a-service offerings are fine. If you want to have a bunch of servers (EC2), a database here and there (RDS) and some serverless functions (Lambda), AWS will serve you just fine.
But if you want something on top of that, like authentication (Cognito), or a PaaS solution like Amplify, be prepared for a sub-par offering compared to the competition. I think Amazon should focus on strengthening their core offerings instead of offering everything and the kitchen sink.
In the end, I dropped Amplify and went with Vercel. $20/user/month is a small price to pay for actually being able to work on the product instead of fighting AWS services and support.
]]>But HERE IT IS!
My first blog post on my new website.
It’s been nigh on 4 years since I last wrote something on my old crib dandydev.net (by the time you’re reading this, I’ll have most probably redirected everything from there to here). I don’t really know why I stopped blogging in the first place, but it probably had something to do with life/work/… getting in the way (or me letting it get in the way anyways).
So what has been going on?
After working for KLM Royal Dutch Airlines for 4.5 years I got a dream position at Source.ag, a new startup co-founded by a friend, focusing on Agriculture & AI. As VP of Engineering I help build both the tech and the team and I’m loving it to bits!
Keeping with the theme of this post, it’s really exciting to start something so brand new. I’m actually employee #1 which gives me ample opportunity to have a major impact. There are no pre-established rules, processes, dynamics. For the first couple of months, it was just the 2 co-founders and me figuring out what to build, how to build it and then actually building it while at the same time trying to grow the company. And now, 5 months after I started, we’re 12 lifeforms strong and growing!
And after my previous job veered more and more into organizational politics instead of tech, it feels great to be building an actual product again. It’s both amazing and terrifying to code most of an MVP all by yourself in 5 months 😱
If you’re interested in bringing positive change to the food system, you can join us
Interlude: why is it that I find starting new things so exciting? I often wonder about this.
I think it comes down to wanting to learn new things as much as possible and I guess I just love exploring the unknown.
But I’m gonna be honest: the challenge is to stick with things. For each side-project I finished, there are many left in the dust. They were never time badly spent, because each time I learnt something new. But I think there is value in finishing things as well.
I hope that a different approach with this blog will make it easier for me to stick with it.
I want to sound off this rambling first blog post by sharing how things that are (going to be) different with this website:
When building this website, there were a few websites that inspired me and/or helped me with actual solutions to coding problems (yay for open source!):
See you next time!
]]>